Google Authenticator F5 IRule

·948 words·5 mins

Two Factor authentication is rather hit and miss in terms of support from web apps.

A quick look around the web turns up an article on DevCentral for a solution to implement google authentication with ldap. As I don’t run a LDAP server at home I needed to hack up the script a bit. This iRule implements the two factor side of things from the above article, but skips the LDAP side of things, as it’s not needed!

when RULE_INIT {
  # auth parameters
  set static::auth_cookie "bigip_virtual_auth"
  set static::auth_cookie_aes_key "AES 128 abcdef0123456789abcdef0123456789"
  set static::auth_timeout 86400
  set static::auth_lifetime 86400

  # name of datagroup that holds AD user to Google Authenticator mappings
  set static::user_to_google_auth_class "user_to_google_auth"

  # lock the user out after x attempts for a period of x seconds
  set static::lockout_attempts 3
  set static::lockout_period 30

  # 0 - logging off
  # 1 - log only successes, failures, and lockouts
  # 2 - log every attempt to access virtual as well as authentication process details
  set static::debug 1

  # HTML for login page
  set static::login_page { 
  
    <div align="center">
      <div align="center" style="border:1px solid;width:300px">
        <h2>Authorization Required</h2>
        <form method="POST">
          user: <br></br>
          Google Authenticator code:
          
          
        </form>
      </div>
    </div>
  
 }
}

when CLIENT_ACCEPTED {
  # per virtual status tables for lockouts and users' auth_status
  set lockout_state_table "[virtual name]_lockout_status"
  set auth_status_table "[virtual name]_auth_status"
  set authid_to_user_table "[virtual name]_authid_to_user"

  # record client IP, [IP::client_addr] not available in AUTH_RESULT
  set user_ip [IP::client_addr]

  # set initial values for auth_id and auth_status
  set auth_id [md5 [expr rand()]]
  set auth_status 2
  set auth_req 1  
}

when HTTP_REQUEST {
	
  if { $auth_req == 1 } {
  # track original URI user requested prior to login redirect
  set orig_uri [b64encode [HTTP::uri]]

  if { [HTTP::cookie exists $static::auth_cookie] && !([HTTP::path] starts_with "/google/auth/login")} {
    set auth_id_current [AES::decrypt $static::auth_cookie_aes_key [b64decode [HTTP::cookie value $static::auth_cookie]]]
    set auth_status [table lookup -notouch -subtable $auth_status_table $auth_id_current]
    set user [table lookup -notouch -subtable $authid_to_user_table $auth_id_current]

    if { $auth_status == 0 } {
      if { $static::debug >= 2 } { log local0. "$user ($user_ip): Found valid auth cookie (auth_id=$auth_id_current), passing request through" }
    } else {
      if { $static::debug >= 2 } { log local0. "Found invalid auth cookie (auth_id=$auth_id_current), redirecting to login"}
      HTTP::redirect "/google/auth/login?orig_uri=$orig_uri"
    }
  } elseif { ([HTTP::path] starts_with "/google/auth/login") && ([HTTP::method] eq "GET") } {
    HTTP::respond 200 content $static::login_page
  } elseif { ([HTTP::path] starts_with "/google/auth/login") && ([HTTP::method] eq "POST") } {
    set orig_uri [b64decode [URI::query [HTTP::uri] "orig_uri"]] 
    HTTP::collect [HTTP::header Content-Length]
  } else {
    if { $static::debug >= 2 } { log local0. "Request for [HTTP::uri] from unauthenticated client ($user_ip), redirecting to login" }
    HTTP::redirect "/google/auth/login?orig_uri=$orig_uri"
  }
  }  
}

when HTTP_REQUEST_DATA {
  if { $auth_req == 1} {
  set user ""
  set ga_code ""

  foreach param [split [HTTP::payload] &] {
    set [lindex [split $param =] 0] [lindex [split $param =] 1]
  }
  
  if { ($user ne "") && ([string length $ga_code] == 6) } {
    set ga_code_b32 [class lookup $user $static::user_to_google_auth_class]

    set prev_attempts [table incr -notouch -subtable $lockout_state_table $user]
    table timeout -subtable $lockout_state_table $user $static::lockout_period

    if { $prev_attempts = 2 } { log local0. "$user ($user_ip): Starting authentication sequence, attempt #$prev_attempts" }

        # begin - Base32 decode to binary

        # Base32 alphabet (see RFC 4648)
        array set static::b32_alphabet {
          A 0  B 1  C 2  D 3
          E 4  F 5  G 6  H 7
          I 8  J 9  K 10 L 11
          M 12 N 13 O 14 P 15
          Q 16 R 17 S 18 T 19
          U 20 V 21 W 22 X 23
          Y 24 Z 25 2 26 3 27
          4 28 5 29 6 30 7 31
        }

        set l [string length $ga_code_b32]
        set n 0
        set j 0
        set ga_code_bin ""

        for { set i 0 } { $i < $l } { incr i } {
          set n [expr $n <= 8 } {
            set j [incr j -8]
            append ga_code_bin [format %c [expr ($n & (0xFF <> $j]]
          }
        }

        # end - Base32 decode to binary

        # begin - HMAC-SHA1 calculation of Google Auth token 
    
        set time [binary format W* [expr [clock seconds] / 30]]
  
        set ipad ""
        set opad ""
  
        for { set j 0 } { $j < [string length $ga_code_bin] } { incr j } {
          binary scan $ga_code_bin @${j}H2 k
          set o [expr 0x$k ^ 0x5C]
          set i [expr 0x$k ^ 0x36]
          append ipad [format %c $i]
          append opad [format %c $o]
        }
        while { $j < 64 } {
          append ipad 6
          append opad \
          incr j
        }
        binary scan [sha1 $opad[sha1 ${ipad}${time}]] H* token

        # end - HMAC-SHA1 calculation of Google Auth hex token 

        # begin - extract code from Google Auth hex token
        set offset [expr ([scan [string index $token end] %x] & 0x0F) <= 2 } { log local0. "$user ($user_ip): Google Authenticator TOTP token matched" }
          set auth_status 0
          set auth_id_aes [b64encode [AES::encrypt $static::auth_cookie_aes_key $auth_id]]
          table add -subtable $auth_status_table $auth_id $auth_status $static::auth_timeout $static::auth_lifetime
          table add -subtable $authid_to_user_table $auth_id $user $static::auth_timeout $static::auth_lifetime
          if { $static::debug >= 1 } { log local0. "$user ($user_ip): authentication successful (auth_id=$auth_id), redirecting to $orig_uri" }
		  HTTP::respond 302 "Location" $orig_uri "Set-Cookie" "$static::auth_cookie=$auth_id_aes;"
          HTTP::collect
        } else {
          if { $static::debug >= 1 } { log local0. "$user ($user_ip): authentication failed - Google Authenticator TOTP token not matched" }
          HTTP::respond 200 content $static::login_page
        }
      } else {
        if { $static::debug >= 1 } { log local0. "$user ($user_ip): could not find valid Google Authenticator secret for $user" }
          HTTP::respond 200 content $static::login_page
      }
    } else {
      if { $static::debug >= 1 } { log local0. "$user ($user_ip): attempting authentication too frequently, locking out for ${static::lockout_period}s" }
      HTTP::respond 200 content "You've made too many attempts too quickly. Please wait $static::lockout_period seconds and try again."
    }
  } else {
    HTTP::respond 200 content $static::login_page
  }
 }  
}


Yubikey and server authentication

·359 words·2 mins

After starting to use the Yubikey for LastPass and various other online servers I’ve started also using my yubikey for SSH access to my server(s).

I’ve touched on google_authenticator and pam_yubico for authentication in a previous post however I will be going into this in a bit more detail.

Taking a machine at home as an example. My requirements are simple

  1. NO SSH Key access to be allowed – as there is no way to require a second factor with an SSH Key (Passphrases can be removed or a new key generated)
  2. Access from Local machines to be allowed without Two Factor being enabled
  3. Yubikey to be the Primary TFA
  4. Fall back to google authenticator should either the Yubico servers be down, an issue with my keys or I just don’t have a USB port available (IE I’m on a phone or whatever)

In order to meet these requirements I’m going to need the following

  1. yubico-pam Yubikey PAM
  2. Google Authenticator PAM
  3. pam_access The server is running Archlinux, and luckily all of these are within AUR – and as such I’m not going to cover the install of the modules.

In order to restrict SSHd access as above I need the following auth lines in /etc/pam.d/sshd

# Check unix password
auth            required        pam_unix.so try_first_pass
# check to see if the User/IP combo is on the skip list - if so, skip the next two lines
auth            [success=2 default=ignore] pam_access.so accessfile=/etc/security/access_yubico.conf
# Check /etc/yubikey for the users yubikey and skip the next line if it all works
auth            [success=1 default=ignore ]     pam_yubico.so id=1 url=https://api.yubico.com/wsapi/2.0/verify?id=%d&otp=%s authfile=/etc/yubikey
# Check against google authenticator
auth            required        pam_google_authenticator.so
auth            required        pam_env.so

The next step is ensure that the relevant users and IP are listed in /etc/security/access_yubico.conf

# Allow welby from 1.2.3.4
+ : welby : 1.2.3.4
# Deny all others
- : ALL : ALL

After this is setup we will also need to setup the yubikey file /etc/yubikey

welby:ccccccdddddd:cccccccccccc

I’m not going to cover configuration of google authenticator with the google-authenticator command

The final changes are to the /etc/ssh/sshd_config ensuring that the following are set

PasswordAuthentication no
PubkeyAuthentication no
PermitRootLogin no
ChallengeResponseAuthentication yes
UsePAM yes


PAM and Two Factor authentication

·293 words·2 mins

As the need for Two factor authentication is a requirement for PCI-DSS (Payment Card Industry standard) and SSH Key with password is not always deemed to be an acceptable form of Two factor authorisation there is now a surge in different forms of two factor auth, all with their own pros and cons.

For a small business or ‘Prosumer’ (professional consumers) the market incumbent (RSA) is not a viable option due to the price of the tokens and the software / appliance that is required. There are cheaper (or free!) alternatives for which two that I’ve used at Google Authenticator, and Yubikey.

Google Authenticator is an OATH-TOTP system that much like RSA generates a one time password once every 30 seconds. It’s avaiable as an App for the Big three mobile platforms (iOS, Android and Blackberry).

Yubikey is a hardware token that emulates a USB keyboard, that when the button is pressed, generates a one time password. This is supported by services such as lastpass.

Both solutions have the ability to be used with their own PAM modules. Installation of either is simple, but what happens if you want to use both, but only require one of these.

Luckily PAM makes it quite easy !

auth            required        pam_unix.so try_first_pass
auth            [success=1 default=ignore ]     pam_yubico.so id=1 url=https://api.yubico.com/wsapi/2.0/verify?id=%d&otp=%s
auth            required        pam_google_authenticator.so

In the above example the user must enter a password and then provide either their yubikey or their google_authenticator.

Should the password be incorrect the user will still be prompted for their yubikey or google authenticator, but will then fail. Should they provide a password and then their yubikey, they will not be asked for their google authenticator. Should they provide password and not a yubikey, they will be prompted for their google authenticator!


Auditd logging all commands

·228 words·2 mins

A common requirement for PCI-DSS is for all commands run by a user who has admin privileges to be logged. There are many ways to do this, most of the time people will opt for a change to the bash configuration or to rely on sudo. There are many ways arround this (such as providing the command that you wish to run as a paramater to SSH). As the linux kernel provides a full auditing system. Using a utility such as auditd, we are able to log all commands that are run. The configuration for this is actually quite simple. In /etc/audit/audit.rules we need to ensure that the following exists.

-a exit,always -F arch=b64 -S execve
-a exit,always -F arch=b32 -S execve

This will capture any execve system call (on exit) and will log this to the auditd log. A log entry will look similar to below.

type=SYSCALL msg=audit(1318930500.123:3020171): arch=c000003e syscall=59 success=yes exit=0 a0=7fff65179def a1=7fff65179ec0 a2=7fff6517d060 a3=7ff54ee36c00 items=3 ppid=9200 pid=9202 auid=0 uid=1000 gid=100 euid=1000 suid=1000 fsuid=1000 egid=100 sgid=100 fsgid=100 tty=(none) ses=4 comm="xscreensaver-ge" exe="/usr/bin/perl" key=(null)
type=EXECVE msg=audit(1318930500.123:3020171): argc=5 a0="/usr/bin/perl" a1="-w" a2="/usr/bin/xscreensaver-getimage-file" a3="--name" a4="/home/welby/Pictures"
type=EXECVE msg=audit(1318930500.123:3020171): argc=3 a0="/usr/bin/perl" a1="-w" a2="/usr/bin/xscreensaver-getimage-file"
type=CWD msg=audit(1318930500.123:3020171):  cwd="/home/welby/Downloads"
type=PATH msg=audit(1318930500.123:3020171): item=0 name="/usr/bin/xscreensaver-getimage-file" inode=208346 dev=fe:02 mode=0100755 ouid=0 ogid=0 rdev=00:00
type=PATH msg=audit(1318930500.123:3020171): item=1 name=(null) inode=200983 dev=fe:02 mode=0100755 ouid=0 ogid=0 rdev=00:00
type=PATH msg=audit(1318930500.123:3020171): item=2 name=(null) inode=46 dev=fe:02 mode=0100755 ouid=0 ogid=0 rdev=00:00

This should keep most auditors happy 🙂


Moving part of an lvm vg from one pv to another

·338 words·2 mins

Lets say that you’ve got multiple physical volumes (PV) in a Volume Group (VG) and you want to migrate the extents from one PV to another, this can be acomplished with a quick and easy pvmove command.

For example

pvdisplay -m
--- Physical volume ---
  PV Name               /dev/sdb1
  VG Name               INTEL_RAID
  PV Size               2.73 TiB / not usable 4.00 MiB
  Allocatable           yes (but full)
  PE Size               4.00 MiB
  Total PE              714539
  Free PE               0
  Allocated PE          714539
  PV UUID               XWiRzE-Ol3d-38En-ND6b-qo93-4zeF-xv8zDv

--- Physical Segments ---  
 Physical extent 0 to 604876:  
 Logical volume /dev/INTEL_RAID/MEDIA  
 Logical extents 0 to 604876  
 Physical extent 604877 to 617676:  
 Logical volume /dev/INTEL_RAID/backups_mimage_0  
 Logical extents 25600 to 38399  
 Physical extent 617677 to 617701:  
 Logical volume /dev/INTEL_RAID/EPG  
 Logical extents 0 to 24  
 Physical extent 617702 to 643301:  
 Logical volume /dev/INTEL_RAID/backups_mimage_0  
 Logical extents 0 to 25599  
 Physical extent 643302 to 714538:  
 Logical volume /dev/INTEL_RAID/MEDIA  
 Logical extents 604877 to 676113

--- Physical volume ---  
 PV Name /dev/sdc1  
 VG Name INTEL_RAID  
 PV Size 2.04 TiB / not usable 2.00 MiB  
 Allocatable yes  
 PE Size 4.00 MiB  
 Total PE 535726  
 Free PE 430323  
 Allocated PE 105403  
 PV UUID laOuKy-5FZa-cJ3h-JffV-qUub-diKC-O0wVqK

--- Physical Segments ---  
 Physical extent 0 to 25599:  
 Logical volume /dev/INTEL_RAID/backups_mimage_1  
 Logical extents 0 to 25599  
 Physical extent 25600 to 54202:  
 Logical volume /dev/INTEL_RAID/MEDIA  
 Logical extents 676114 to 704716  
 Physical extent 54203 to 67002:  
 Logical volume /dev/INTEL_RAID/NZB_DOWNLOAD  
 Logical extents 0 to 12799  
 Physical extent 67003 to 79802:  
 Logical volume /dev/INTEL_RAID/backups_mimage_1  
 Logical extents 25600 to 38399  
 Physical extent 79803 to 105402:  
 Logical volume /dev/INTEL_RAID/OLD_VM  
 Logical extents 0 to 25599  
 Physical extent 105403 to 535725:  
 FREE  

From here you can see that /dev/INTEL_RAID/MEDIA is a Logical Volume (LV) on both PVs within the VG. If I was wanting to grow my mirrored LV, which requires space on both PVs, I’d have to migrate some of the extents of another LV. If I wanted to move some of the MEDIA lv, I should be able to do the following
pvmove /dev/sdb:643302-714538 /dev/sdc
This will move extents 643302-714538 to the next contiguious block on /dev/sdc


Dahdi In LXC

·442 words·3 mins

At home we use various VoIP providers to either get free calls to various places (GTalk/GVoice to america for instance) and various other destinations over SIP providers

I’ve been using Asterisk for years (I remeber the 0.7 release) and have implemented it for companies before, usually with no issues, baring the continuall deadlocks in the 1.2 range. Recently I enabled my VoIP network segment for IPv6 only to find that GTalk stoped working on IPV6 Day. After a bit of digging about, it seems that Asterisk 1.8 does support IPV6! But, gtalk and similar are not supported, SIP is infact the only first class citezen it seems.

I’ve toyed with using freeswitch before, but unfortuantly have had varied sucsess with FreeTDM to Dahdi with BT caller ID and the likes. I did hack in support for it, but I’m not too sure if I trust my code, as my C is quite rusty to say the least.

I did however come up with another solution!

As I’m running a moderatly new Linux Kernel I can use LXC – Linux Containers – which are effectilvy the same idea as a wpar, chroot, openvz, whatever. After setting up asterisk in the LXC I needed to expose my Dahdi card to it. LXC allows you to restrict access on a per device basis. I’ve setup Dahdi on the host machine as normal so the kernel modules can be loaded etc. Once this is done I’ve preformed the following within the LXC

cd /
mkdir dev/dahdi
mknod dev/dahdi/1 c 196 1
mknod dev/dahdi/2 c 196 2
mknod dev/dahdi/3 c 196 3
mknod dev/dahdi/4 c 196 4
mknod dev/dahdi/channel c 196 254
mknod dev/dahdi/ctl c 196 0
mknod dev/dahdi/pseudo c 196 255
mknod dev/dahdi/timer c 196 253
mknod dev/dahdi/transcode c 196 250

This creates the Device nodes within /dev/ for my 4 dahdi channels (3FXS 1FXO if anyone is interested). After this I’ve added the following to the lxc config file, to allow the LXC to have access to these devices

# If you want to be lazy just add this line
#lxc.cgroup.devices.allow = c 196:* rwm`

#Otherwise use the following  
lxc.cgroup.devices.allow = c 196:0 rwm  
lxc.cgroup.devices.allow = c 196:1 rwm  
lxc.cgroup.devices.allow = c 196:2 rwm  
lxc.cgroup.devices.allow = c 196:3 rwm  
lxc.cgroup.devices.allow = c 196:4 rwm  
lxc.cgroup.devices.allow = c 196:250 rwm  
lxc.cgroup.devices.allow = c 196:253 rwm  
lxc.cgroup.devices.allow = c 196:254 rwm  
lxc.cgroup.devices.allow = c 196:255 rwm  

This will obviously only work for the first 4 dahdi channels, but if you need more, just continue adding the 196:x lines, replacing x with the channel number, and also ensuring that you create the device nodes in the same way


A quick (and quite unscientific!) break down of Rackspace CloudFiles UK vs Amazon S3 (Ireland)

·699 words·4 mins

(Disclaimer – I’m a Rackspace Employee, the postings on this site are my own, may be bias, and don’t necessarily represent Rackspace’s positions, strategies or opinions. These tests have been preformed independently from my employer by my self)

As Rackspace have recently launched a ‘beta’ Cloudfiles service within the UK I thought I would run a few tests to compare it to Amazon’s S3 service running from Eire (or Southern Ireland).

I took a set of files, totalling 18.7GB, with file sizes ranging from between 1kb and 25MB, text files, and contents being mainly Photos (both JPEG and RAW (cannon and nikon), plain text files, GZiped Tarballs and a few Microsoft Word documents just for good measure.

The following python scripts were used:

Cloud Files #

Upload


import cloudfiles
import sys,os

api_username="USERNAME"
api_key="KEY"
auth_url="https://lon.auth.api.rackspacecloud.com/v1.0"
dest_container="CONTAINER"
local_file_list = sys.stdin.readlines()
cf = cloudfiles.get_connection(api_username, api_key, authurl=auth_url)
containers = cf.get_all_containers()
for container in containers:
    if container.name == dest_container:
            backup_container = container

def upload_cf(local_file):
    u = backup_container.create_object(local_file)
    u.load_from_filename(local_file)

for local_file in local_file_list:
        local_file = local_file.rstrip()
        local_file_size = os.stat(local_file).st_size/1024
        print "uploading %s (%dK)" % (local_file, local_file_size)
        upload_cf(local_file)

Download


api_username="USERNAME"
api_key="KEY"
auth_url="https://lon.auth.api.rackspacecloud.com/v1.0"
dest_container="CONTAINER"


import cloudfiles
import sys,os

#Setup the connection
cf = cloudfiles.get_connection(api_username, api_key, authurl=auth_url)

#Get a list of containers
containers = cf.get_all_containers()

# Lets setup the container
for container in containers:
    if container.name == dest_container:
            backup_container = container

#Create the container if it does not exsit
try:
    backup_container
except NameError:
    backup_container = cf.create_container(dest_container)

# We've now got our container, lets get a file list
def build_remote_file_list(container):
    remote_file_list = container.list_objects_info()
    for remote_file in remote_file_list:
        f = open(remote_file['name'],'w')
        rf = container.get_object(remote_file['name'])
        print remote_file['name']
        for chunk in rf.stream():
            f.write(chunk)
        f.close()
remote_file_list = build_remote_file_list(backup_container)

s3 #

Upload


from boto.s3.connection import S3Connection
from boto.s3.key import Key
import sys,os

dest_container = "CONTAINER"

s3 = S3Connection('api','api_secret')

buckets = s3.get_all_buckets()

for container in buckets:
    if container.name == dest_container:
                backup_container = container

def build_remote_file_list(container):
    remote_file_list = container.list()
    for remote_file in remote_file_list:
        print remote_file
        f = open(remote_file,'w')
        rf = container.get_key(remote_file)
        #print remote_file['name'
        rf.get_file(f)
        f.close()

local_file_list = sys.stdin.readlines()

def upload_s3(local_file):
    k = Key(backup_container)
    k.key = local_file
    k.set_contents_from_filename(local_file)

for local_file in local_file_list:
        local_file = local_file.rstrip()
        local_file_size = os.stat(local_file).st_size/1024
        print "uploading %s (%dK)" % (local_file, local_file_size)
        upload_s3(local_file)

Download


from boto.s3.connection import S3Connection
from boto.s3.key import Key
import sys,os

dest_container = "CONTAINER"

s3 = S3Connection('api','apt_secret')

buckets = s3.get_all_buckets()

for container in buckets:
    if container.name == dest_container:
                backup_container = container

def build_remote_file_list(container):
    remote_file_list = container.list()
    for remote_file in remote_file_list:
        print remote_file.name
        f = open(remote_file.name,'w')
        rf = container.get_key(remote_file.name)
        #print remote_file['name'
        rf.get_file(f)
        f.close()


remote_file_list = build_remote_file_list(backup_container)

The test was preformed from a Linux host which has a 100MBit connection (Uncapped/unthrottled) in London, however the test was also preformed with almost identical results from a machine in Paris (also 100mbit). Tests were also run from other locations (Dallas Fort Worth – Texas, my home ISP (bethere.co.uk)) however these locations were limited to 25mbit and 24mbit , and both reached their maximum speeds.

The tests were as follows:

  1. Download files from Rackspace Cloudfiles UK (these had been uploaded previously) – This is downloaded directly via the API, NOT via a CDN
  2. Upload the same files to S3 Ireland
  3. Upload the same files to a new “container” at Rackspace Cloudfiles UK
  4. Download the files from S3 Ireland – This is downloaded directly via the API, NOT via a CDN

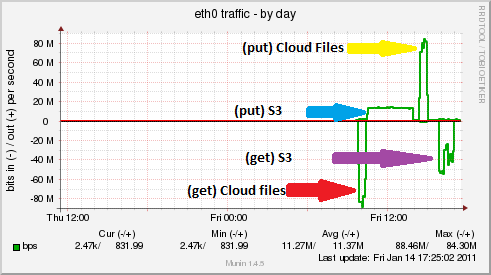
The average speeds for the tests are as follows:

Cloudfiles #

Download: 90Mbit/s
Upload: 85MBit/s

S3 Ireland #

Download: ~40Mbit/s
Upload : 13Mbit/s

Observations

  1. Cloud files seems to be able to max out a 100mbit connection for both File
  2. S3 seems to have a cap of 13mbit for inbound file transfers?
  3. S3 seems to either be extremely unpredictable on file transfer speeds for downloading files via the API, or there is some form of cap after a certain amount of data transferred, or there was congestion on the AWS network Below is a graph showing the different connection speeds achieved using CF & S3
    &ldquo;Cloudfiles UK &amp; Amazon S3-EU&rdquo;

As mentioned before this is a very unscientific test (and I’d say that these results have not been replicated from as many locations or as many times as I’d like to, so I would take them with a pinch of salt) , but it does appear that Rackspace cloudfiles UK is noticeably faster than S3 Ireland


iPhone to Android SMS Converstion Script

·114 words·1 min

Here’s a copy of my iPhone to Android script. Just a quick and dirty python script that reads in a backup from itunes and converts it to a bit of XML able to be read in by SMS Backup and Restore on the android platform

from sqlite3 import *
from xml.sax.saxutils import escape
import codecs
import re
f = codecs.open('sms.xml','w','utf-8')
f.write ('''

''')
# This is 31bb7ba8914766d4ba40d6dfb6113c8b614be442.mddata or 31bb7ba8914766d4ba40d6dfb6113c8b614be442.mdbackup usally
c = connect('sms.db')
curs = c.cursor()
curs.execute('''SELECT address,date,text,flags FROM message WHERE flags <5 ORDER BY date asc''')
for row in curs:
        a= escape(unicode(row[0]))
        d = escape(unicode(row[1]))
        t = row[3]-1
        t = str(t)
        b = re.sub('"',"'",escape(unicode(row[2])))

        f.write( ''+"n")
f.write(
'''''' )


IRSSI Prowl Notifications

·254 words·2 mins

A quick script to send notifications from IRSSI for privmessages and also for highlights, I’ll put more commentary on later, but for now..


use strict;
use vars qw($VERSION %IRSSI);
use Irssi;
use LWP::UserAgent;

$VERSION = '0.1';

%IRSSI = (
        authors => 'Welby McRoberts',
        contact => '[email protected]',
        name => 'irssi_prowler',
        description => 'Sends a notification to Prowl to alert an iPhone of a new highlighted message',
        url => 'http://www.whmcr.com/2009/07/irssi-prowl-notifications',
        changes => 'Friday, 10 Jun 2009'
);

######## Config
my($PRIV_PRI, $PRIV_EVENT, $HI_PRI, $HI_EVENT, $APP, $UA, $APIKEY);
$PRIV_PRI = 2;
$PRIV_EVENT = 'Private Message';
$HI_PRI = 1;
$HI_EVENT = 'Highlight';
$APP = 'irssi';
$UA = 'irssi_prowler';
$APIKEY='7b5d817bd95911b4c049e3034dcf7a96dfa3fb53';
########

####### Highlights

sub highlight {
        my ($dest, $text, $stripped) = @_;
        if ($dest->{level} & MSGLEVEL_HILIGHT) {
                print "prowl($HI_PRI, $APP, $HI_EVENT, $text)";
                prowl($HI_PRI, $APP, $HI_EVENT, $text);
        }
}

####### Private Messages

sub priv {
        my ($server, $text, $nick, $host, $channel) = @_;
        print "prowl($PRIV_PRI, $APP, $PRIV_EVENT, $text)";
        prowl($PRIV_PRI, $APP, $PRIV_EVENT, $text);
}

####### Prowl call

sub prowl {
        my ($priority, $application, $event, $description) = @_;
        my ($request, $response, $url, $lwp);
        print 'pri: '.$priority;
        print 'app: '.$application;
        print 'event: '.$event;
        print 'description: '.$description;

        ######## Setting up the LWP
        $lwp = LWP::UserAgent->new;
        $lwp->agent($UA);
        # URL Encode
        $application =~ s/([^A-Za-z0-9])/sprintf("%%%02X", ord($1))/seg;
    $event =~ s/([^A-Za-z0-9])/sprintf("%%%02X", ord($1))/seg;
    $description =~ s/([^A-Za-z0-9])/sprintf("%%%02X", ord($1))/seg;
        # Setup the url
        $url = sprintf("https://prowl.weks.net/publicapi/add?apikey=%s&priority=%d&application=%s&event=%s&description=%s&",
                                        $APIKEY,
                                        $priority,
                                        $application,
                                        $event,
                                        $description
                                        );
        print $url;
        $request = HTTP::Request->new(GET => $url);
        $response = $lwp->request($request);
        print $response;
}

####### Bind "message private" to priv()
Irssi::signal_add_last("message private", "priv");
####### Bind "print text" to highlights()
Irssi::signal_add_last("print text", "highlight");


Lighttpd: mod_security via mod_magnet

·554 words·3 mins

In most large enterprises there is a requirement to comply with various standards. The hot potato in the Ecommerce space at the moment (and has been for a few years!) is PCI-DSS.

At $WORK we have to comply with PCI-DSS with the full audit and similar occurring due to the number of transactions we perform. Recently we’ve deployed lighttpd for one of our platforms, which has caused an issue for our Information Security Officers and Compliance staff.

PCI-DSS 6.6 requires EITHER a Code review to be preformed, which whilst this may seem to be an easy task, when you’re talking about complex enterprise applications following a very……… agile development process it’s not always an option. The other option is to use a WAF (Web Application Firewall). Now there are multiple products available that sit upstream and perform this task. There is however an issue if you use SSL for your traffic. Most WAF will not do the SSL decryption / reencryption between the client and server (effectively becoming a Man in the Middle). There are however a few products which do this, F5 networks’ ASM being one that springs to mind. Unfortunately this isn’t always an option due to licensing fees and similar. An alternative is to run a WAF on the server its self. A common module for this is Mod_Security for Apache. Unfortunately, a similar module does not exist for Lighttpd.

In response to $WORKs requirement for this I’ve used mod_magnet to run a small lua script to emulate the functionality of mod_security (to an extent at least!). Please note that mod_magent is blocking, so will cause any requests to be blocked until the mod_magnet script has completed, so be very careful with the script, and ensure that it’s not causing any lag in a test environment, prior to deploying into live!

Below is a copy of an early version of the script (most of the mod_security rules that we have are specific to work, so are not being included for various reasons), however I’ll post updates to this soon.

/etc/lighttpd/mod_sec.lua

-- mod_security alike in LUA for mod_magnet
LOG = true
DROP = true

function returnError(e)
        if (lighty.env["request.remote-ip"]) then
                remoteip = lighty.env["request.remote-ip"]
        else
                remoteip = "UNKNOWN_IP"
        end
        if (LOG == true) then
                print ( remoteip .. " blocked due to ".. e .. " --- " ..
                                lighty.env["request.method"] .. " " .. lighty.request["Host"] .. " " .. lighty.env["request.uri"])
        end
        if (DROP == true) then
                return 405
        end
end

function SQLInjection(content)
        if (string.find(content, "UNION")) then
                return returnError('UNION in uri')
        end
end

function UserAgent(UA)
        UA = UA:gsub("%a", string.lower, 1)
        if (string.find(UA, "libwhisker")) then
                return returnError('UserAgent - libwhisker')
        elseif (string.find(UA, "paros")) then
                return returnError('UserAgent - paros')
        elseif (string.find(UA, "wget")) then
                return returnError('UserAgent - wget')
        elseif (string.find(UA, "libwww")) then
                return returnError('UserAgent - libwww')
        elseif (string.find(UA, "perl")) then
                return returnError('UserAgent - perl')
        elseif (string.find(UA, "java")) then
                return returnError('UserAgent - java')
        end
end

-- URI = lighty.env["request.uri"]
-- POST = lighty.request
if ( SQLInjection(lighty.env["request.uri"]) == 405) then
       ret = 405
end
if ( UserAgent(lighty.request["User-Agent"]) == 405) then
       ret = 405
end
return ret

The following needs to be added to lighttpd.conf to attach this LUA script via mod magnet

server.modules += ( "mod_magnet" )
magnet.attract-physical-path-to = ( "/etc/lighttpd/mod_sec.lua")
  • Update – 23 Aug 09 - Updated to return code even if one test passes

Comments or suggestions are appreciated!